This is an Australian thing! If you are not from Australia, you probably don’t need to do this, but in case you do, here it is!
The ARC’s Research Management System has an outputs section that is, of course, mandatory, and is, equally of course, different from everyone else’s system.
I try and culture my references in Google Scholar, ORC ID, and my resume, and I don’t want to manually enter them into RMS, especially when a grant deadline is close. So here is one way to avoid that.
To use this method, it really helps if you have a Mac or Linux machine handy. I am sure it can be done on Windows, but I don’t know how!
We are going to do a very small amount of command line work. Sorry about that!
First, lets make a virtual environment and set it up with the additional programs we need:
virtualenv venv
source venv/bin/activate
pip install pybtex
# this next bit should be all on one line
curl -Lo orcid_vs_google.py
https://raw.githubusercontent.com/linsalrob/EdwardsLab/master/refs%20and%20citations/orcid_vs_google.py
Next, we need to download all your references from ORCID and from Google Scholar.
Download references from Google Scholar
Head to Google Scholar and choose My Profile. Click the checkbox next to TITLE to choose some references (it doesn’t matter if it is all of them or not at this stage)

Click the new EXPORT button that appears

Choose BIBTEX from the pull down menu

And then All my articles from the next menu

This opens your citations in a new window, and so Right (or CTRL) click on the page, and choose Save As.
I usually call this file google_scholar.bib so I can find it later.
Download Citations from ORCID
Head over to ORCID’s sign in page and log in.
Scroll down to Works and select export works

This will give you the Bib Tex exporter (see where we are going here?) and when you click Export it will take a few minutes but automatically download the file for you

This will download a file called works.bib. I usually rename that to orcid.bib
Now you need to copy those two files to where you have the orcid_vs_google.py code.
Comparing ORCID and Google Scholar
If you have named your files as above, you should be able to run this command
python orcid_vs_google.py -g google_scholar.bib -o orcid.bib
The first time you run it, you will likely get a few errors because of duplicate IDs. This is an issue with Google, and while Rob could write the code to overcome this, he has not done this yet (be sure to ask him for an update).
Edit the google_scholar.bib file with your favorite text editor, and just either delete the duplicate entries, or add a letter to the ID so make it different. (e.g convert edwards1995role to edwards1995role1 and it will work).
Once you have made these changes, run the code again and it will tell you how many references are unique to each system:
Found 238 references in the Google bibtex and 250 references in the ORCID bibtex
18 references are unique to Google
30 references are unique to ORCID
It will also output two new files:
- refs_google_not_orcid.bib are the references in Google Scholar that are not in ORC ID
- refs_orcid_not_google.bib are the references in ORC ID that are not in Google Scholar
At this point, it is all manual, I’m afraid.
I open refs_google_not_orcid.bib in my favorite text editor, and edit those references. Some of them will be thesis chapters or bioRxiv papers that are not supposed to be in RMS. Others will be papers that Google has added to your profile erroneously. I delete all of those from this .bib file, and delete erroneous papers from my Google profile (there goes your H factor).
Similarly, I take a look through the refs_orcid_not_google.bib and find references that should be in Google Scholar but do not appear to be. You can always click the + button and then choose Add articles. This opens a search box where you can search for your citations (e.g. by title) and if they are in your profile already it tells you.
Update ORC ID
Once you are happy with your curated set of references that are in Google Scholar and not ORC ID, lets head back to ORC ID and update them
Click the + Add works button to add new works to ORC ID
Now choose Import Bib TeX from the drop down menu
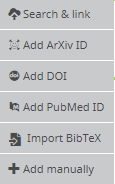
When the new menu appears, click Choose File and navigate to your refs_google_not_orcid.bib file

Finally, you can choose the Save All button to add all these works to ORC ID

Updating RMS
Finally, we need to update RMS. Head over to the ARCs RMS and log back in (you surely will have been logged out)
Scroll down to research outputs at the bottom, and choose the Populate from ORC ID button

Pro-tip: If you have a lot of mistakes in your RMS profile, just delete the whole thing and then click Populate from ORCID again. It will reload everything!
That’s it! Easy, eh?
What about other reference managers?
You can use any Bib TeX file in this approach. I personally use Google Scholar and ORC ID, but the code is agnostic, and so as long as your reference manager supports Bib TeX (hint: they all do), you can do this. Your files will still be called Google and ORCID, but you’ll know where they really come from!