A few tips and tricks for working with slurm (i.e. submitting jobs using sbatch) that I frequently forget!
Continue reading
Primer Trimming Challenge
In DNA sequencing, we add primers and adapters to the ends of sequences. These are short (typically <50bp) known sequences, that we use so we can identify different kinds of sequences. You can find out more about the adapters in this YouTube video.
This challenge is to write software to efficiently detect and remove the primers and adapters from a fastq format file.
Continue reading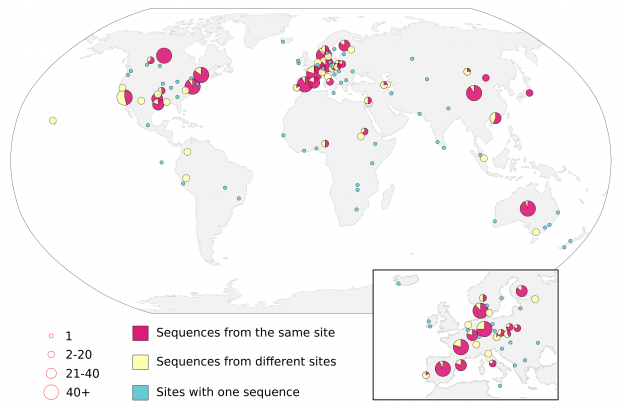
How to make beautiful maps
Making maps is hard. Even though we’ve been making maps for hundreds of years, it is still hard. Making good looking maps is really hard. We published a map that is both beautiful and tells a story, and this is the story of how we made that map.
But a figure like this does not appear immediately, it takes work to get something to look this good, and needless to say it wasn’t me that made it look so great!
Continue reading
Updating Google Scholar and ORCID
We use Google Scholar a lot to search the literature, but also to track our own works. Several grant administration systems use ORCID to retrieve citations. Here is how you can “easily” update ORCID with all your citations from Google Scholar.
Continue reading
Updating CAT/BAT with prophage data
CAT/BAT by Bastiaan von Meijenfeldt and Bas Dutilh is a terrific tool for assigning taxonomy to contigs or metagenome bins. However, phages, and especially prophages, cause some problems because their taxonomy clashes with the bacterial taxonomy. Here is how to update the taxonomic profiles to handle prophages somewhat better.
Continue reading
Things I can never remember for Snakemake
These are some of the things that I can never remember how to do in snakemake but they make life just that little bit easier.
Continue reading
Diversity, Equity, and Inclusion
Diversity, Equity, and Inclusion Statement
Diversity is a key element to the success of every organization and the tech community. Freedom of thought and the open exchange of ideas are key to an effective learning environment. That kind of exchange can happen only in an environment that recognizes the value of each person and fosters mutual respect. Rob Edwards and members of the Edwards Lab are committed to increasing and fostering a diverse community of colleagues.
Code of Conduct
We are dedicated to creating an inclusive environment for everyone, regardless of race, ethnicity, nationality, religion, skin color, sex, sexual orientation, gender identity, national origin, age, health (physical or mental), genetic information, parental status, marital status, political affiliation, veteran status, socioeconomic status or background, neuro(a)typicality, appearance, body size, computing experience, or clothing. Consider that calling attention to differences can feel alienating.
We do not tolerate harassment in any form towards any person. Harassment includes offensive verbal comments related to the classes above, sexual images in public spaces, deliberate intimidation, stalking, following, photography or audio/video recording against reasonable consent, sustained disruption of talks or other events, inappropriate physical contact, and unwelcome sexual attention (even without sexual contact). Harassment does not need to be recognized as unwanted or unwelcome by anyone other than the person being harassed. Be careful in the words that you choose. Remember that sexist, racist, and other exclusionary jokes can be offensive to those around you. Offensive jokes are not appropriate and will not be tolerated under any circumstances.
If you are being harassed, notice that someone else is being harassed, or have any other concerns, please immediately contact Dr. Rob Edwards
Equity
Inclusion and equity are not synonyms. Inclusion is just one part of equity, and to be equitable Rob and members of his lab strive to provide empowerment, agency, access, and respect.
- Inclusion – Everyone is welcome in the lab. We all have strengths and weaknesses, and everyone contributes to every project.
- Empowerment – As you work and study in the lab we want you to become more confident in your abilities and to grow as a person
- Agency – we will enable you to make your own choices and to relish the successes that result from those choices
- Access – we will be there to support you when you need us
- Respect – we accept you for who you are
If you feel any of these are lacking, you should immediately talk to Rob or one of his supervisors.
Harassment Policy
Harassment of any kind is not acceptable behavior. We are committed to creating an environment in which every individual can work, study, and live without being harassed.
Harassment on the basis of race, ethnicity, nationality, religion, skin color, sex, sexual orientation, gender identity, national origin, age, health (physical or mental), genetic information, parental status, marital status, political affiliation, veteran status, socioeconomic status or background, neuro(a)typicality, appearance, body size, computing experience, or clothing. It includes harassment of an individual in terms of a stereotyped group characteristic, or because of that person’s identification with a particular group.
Sexual harassment may take many forms. Sexual assault and requests for sexual favors that affect educational or employment decisions constitute sexual harassment. However, sexual harassment may also consist of unwanted physical contact, requests for sexual favors, visual displays of degrading sexual images, sexually suggestive conduct, or offensive remarks of a sexual nature.
We are committed under this policy to stopping harassment and associated retaliatory behavior.
Anyone who feels harassed is encouraged to seek assistance from Rob or his supervisors.
About
This Code of Conduct was adapted from the Make School Code of Conduct, which in turn was adapted from Hack Code of Conduct which was inspired by the Conference Code of Conduct. The harassment policy has been adapted from MIT’s Harassment Policy.
Licensed under Creative Commons 4.0 (Attribution, Share Alike).
Publishing a Django Website behind a proxy server
We use proxy servers all the time: we have a main server (eg http://edwards.sdsu.edu/) that serves applications (eg. http://edwards.sdsu.edu/GenomePeek) but the application itself runs on different hardware than the webserver.
Here, we show how to host a Django project on a proxy server using the apache web server and make it accessible.
Continue reading
Making a java .jar executable
This is just a brief tip on how to simply wrap a java .jar file into an executable. This approach does no error checking, and it is up to the user to ensure that you are passing the appropriate variable.

Setting up a git fork
I can never remember how to do this, so here, in a few lines is how to correctly set up a git fork to allow you to contribute to other people’s code
Continue reading